UITableViewとUITableViewCellの使い方です
Xcode 8 と Swift 3を使います
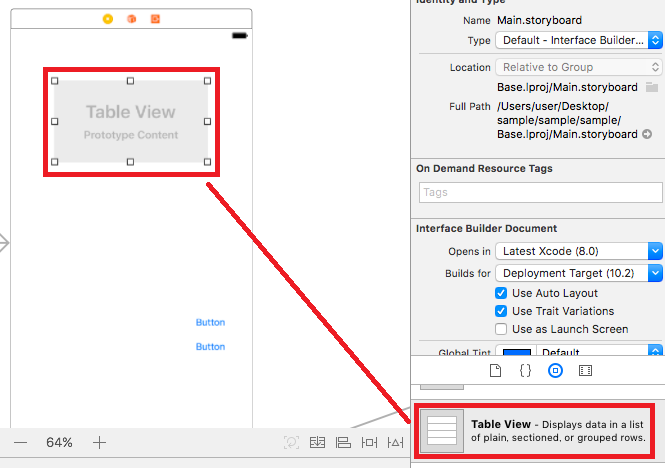
①UITableViewをドラッグ&ドロップします
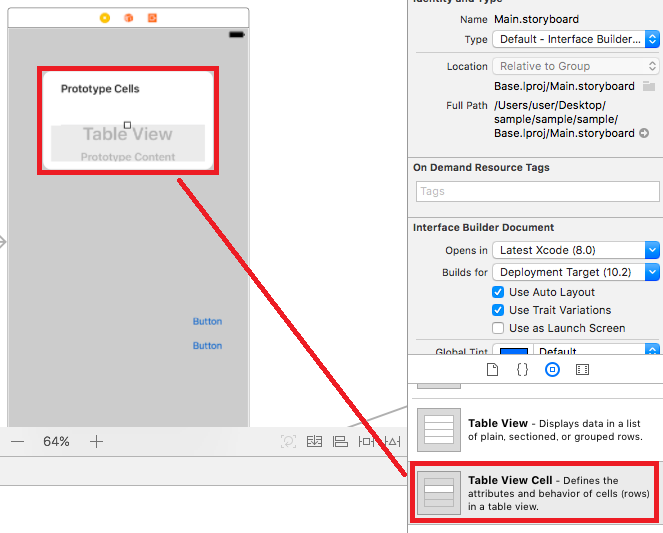
②更にその上にUITableViewCellをドラッグ&ドロップします
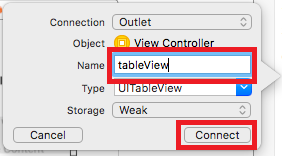
③UITableViewを右クリックしてソースエディターにドラッグします
接続パネルが表示されるので「Name」を入力して「Connect」をクリックします
④以下のコードを記述します
import UIKit

// , UITableViewDataSource, UITableViewDelegate を追加↓
class ViewController: UIViewController, UITableViewDataSource, UITableViewDelegate {

    @IBOutlet weak var tableView: UITableView!

    let rows = ["1", "2", "3", "4", "5", "6", "7", "8", "9", "10"]

    override func viewDidLoad() {
        super.viewDidLoad()
        // Do any additional setup after loading the view, typically from a nib.

        // delegateとdataSourceを設定
        tableView.delegate = self
        tableView.dataSource = self

    }

    override func didReceiveMemoryWarning() {
        super.didReceiveMemoryWarning()
        // Dispose of any resources that can be recreated.
    }

    // tableViewメソッド セルの数を設定
    func tableView(_ tableView: UITableView, numberOfRowsInSection section: Int) -> Int {
        return rows.count
    }

    // tableViewメソッド セルの高さを設定
    func tableView(_ tableView: UITableView, heightForRowAt indexPath: IndexPath) -> CGFloat {
        return 30
    }

    // tableViewメソッド セルの作成
    func tableView(_ tableView: UITableView, cellForRowAt indexPath: IndexPath) -> UITableViewCell {
        let tableViewcell: UITableViewCell = UITableViewCell(style: UITableViewCellStyle.subtitle, reuseIdentifier: "Cell")
        tableViewcell.textLabel?.text = rows[indexPath.row]
        return tableViewcell
    }

    // tableViewメソッド セルがタップされた時のイベント
    func tableView(_ tableView: UITableView, didSelectRowAt indexPath:IndexPath) {
        print(rows[indexPath.row])
    }

}
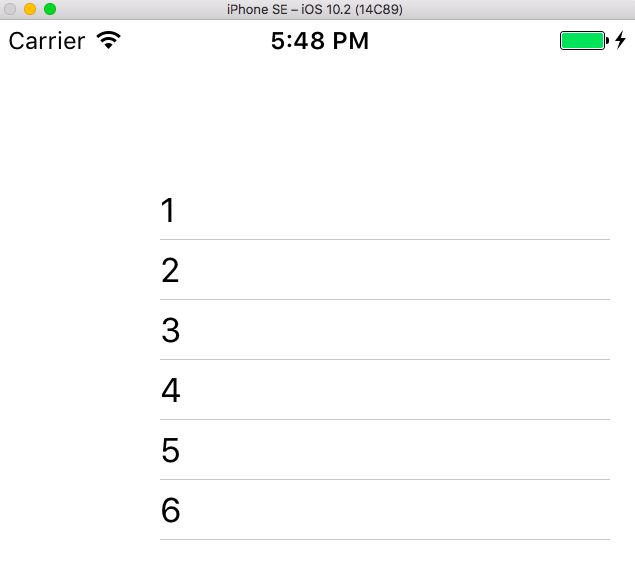
実行結果は以下のとおりです